Establishing a git workflow with VSTS and Visual Studio - pull requests
In this post I will look at pull request processing in VSTS. Over and above the pull request process, what is also interesting is any differences in the commit graph on the remote repo when merging up from a merged as compared to a rebased branch. As with previous posts in this series, this post will not make a case for either, though findings will contribute to the workflow that will be decided upon.
All posts in this series on establishing a git workflow for VSTS and Visual Studio are:
- Establishing a git workflow with VSTS and Visual Studio
- Configuring a VSTS repo from the Github sample repo
- Git merge
- Git rebase
- Pull requests (this post)
Recap on setup
If you have just landed on this post then a quick word on set up. This post builds on the previous posts on git merge and git rebase, and since this series is about establishing a git workflow with VSTS the post Configuring a VSTS repo from the Github sample repo outlines the steps to configuring the VSTS git repo.
Creating a pull request following git merge
Picking up from where we left off on Git merge, from Visual Studio Team Explorer navigate to the Home view, select Branches and ensure merge_branch is the checked out branch. Then navigate to the Home view, select Sync and then select Push as shown below.
Now the branch has been pushed to VSTS, we will switch to our VSTS git repo to continue pull request processing. The repo landing page defaults to the master branch, and presents a tree view on the left with workspace to the right that defaults to Files tab. When branch code is is pushed, VSTS presents a message in the workspace with a link to Create a pull request, as shown below.
Alternatively, a pull request can be created by selecting the Branches tab. From the list of branches presented in the workspace, hover over or select the required branch, in this case merge_branch, and then select the New pull request link that appears to the right. This is shown below.
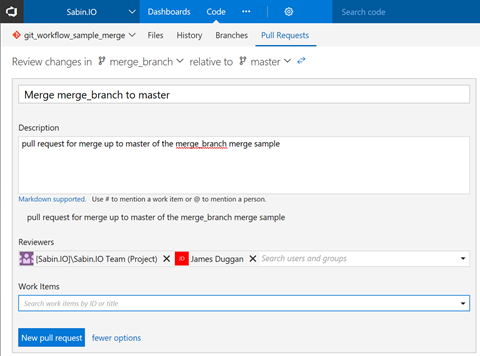
Regardless of the route taken the pull request details will be presented in the Pull Requests tab. The defaulted Title can be updated and a Description, which is not mandatory, should be entered. Reviewers is defaulted as the default team for the project, in this case Sabin.IO Team and Sabin.IO respectively. This can be removed and / or individuals added. For completeness the work item(s) should be entered. Once these entries are completed create the pull request by clicking New pull request.
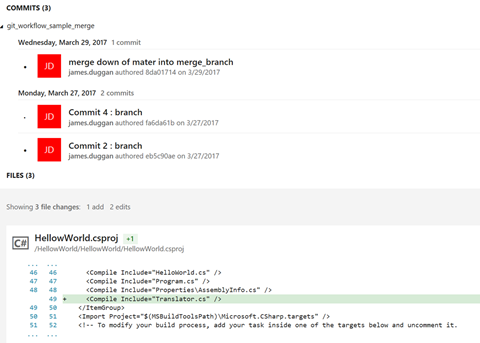
Prior to creating the pull request one can verify the commit and file content by scrolling down the Pull Requests workspace. The commits and a file change relating to the above pull request are shown below.
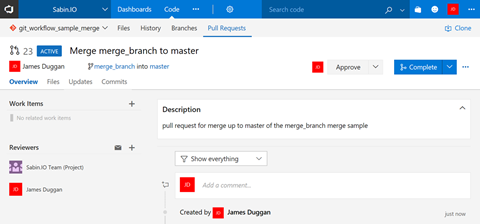
Once the pull request is created the Pull Requests workspace changes to show its details, as shown below.
An aspect of pull request processing that will not be covered here is peer review and the features supporting code annotations and discussion around the change. It is pretty much real time and provides a very useful timeline.
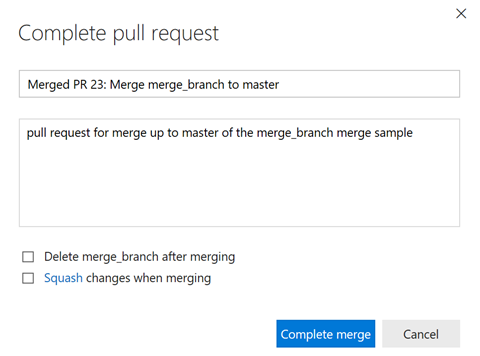
Assuming then that good peer review practice is followed with everyone agreeing the change is awesome, the pull request can be approved by clicking Approve or by clicking the drop down menu arrow select Approve with suggestions. Once approved click Complete and at the pop-up window click Complete pull request as shown below.
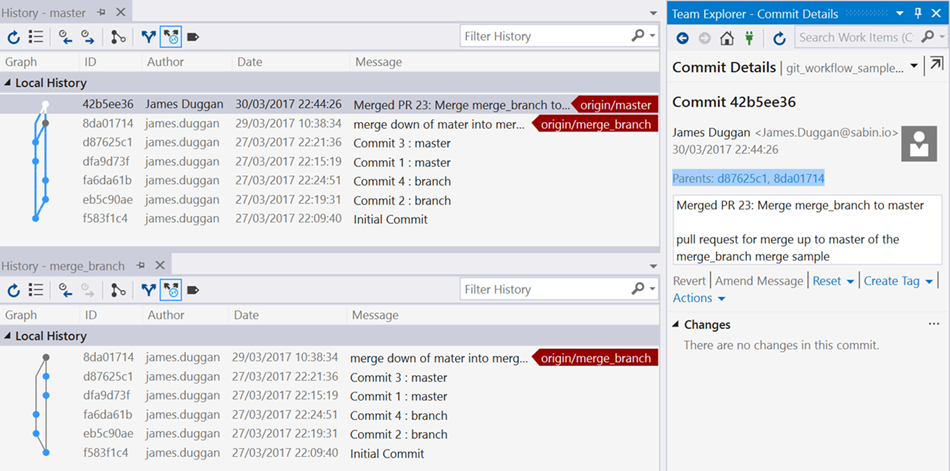
For completeness we can now switch back to Visual Studio and via Team Explorer ensure the master branch is the checked out branch and is synced with VSTS . If we then compare the master and merge_branch, as shown below, we can see the the the master branch has now been updated to reflect the merge_branch commits (incl. of the merge down commit) and the pull request commit. The pull request commit does not contain content and has as parents the commit 3 on master and the merge_branch’s merge down commit.
Creating a pull request following git rebase
We now pick up from where we left off on Git rebase, from Visual Studio Team Explorer first ensure the merge_branch is the checked out branch. Then navigate to the Home view, select Sync and then click Sync as shown below.
Hereafter the process for creating a pull request is identical to that previously described. We will therefore go to the Visual Studio branch history to view the end state, which is shown below.
In this case the master branch has been updated to reflect the rebased merge_branch commits and a pull request commit that has as parents the commit 3 on master and the merge_branch’s commit 4.
Summary
As shown, VSTS makes pull request processing easy, and though it was not looked into here its features to support peer review and discussion around change are intuitive and useful.
Insofar as pull request processing is concerned there is no difference between a merge or a rebase workflow, and this makes sense. Pull request processing is really about controlling how code is merged up, for example, from a feature branch to master. The real difference is in the master branch’s commit history with the rebased commit history looking cleaner and clearer; a reason for it often being preferred.
However, the sample to date has been deliberately simple. The next post will look at rebase across multiple commits and commit squashing, and it is in these more complex examples where the benefits of a choosing a good workflow become more apparant.


